Camera Config
Background Introduction
This application can provide a series of functions related to the camera summary, including core functions such as AI analysis, live video broadcasting, pan-tilt control, cloud video recording, etc. Users can use this product to adapt to a variety of different application scenarios according to their own needs and camera configuration.
Whether you are using the AI Analysis intelligent alarm function or playing a video stream, you need to configure it in the background and bind the camera to the system before you can use the following series of functions.
Distinguish from the camera function, the system can access the camera is divided into two types:
- AI analysis function
- Video playback function
The following details the entire process from camera configuration to specific use.
一、Configuration
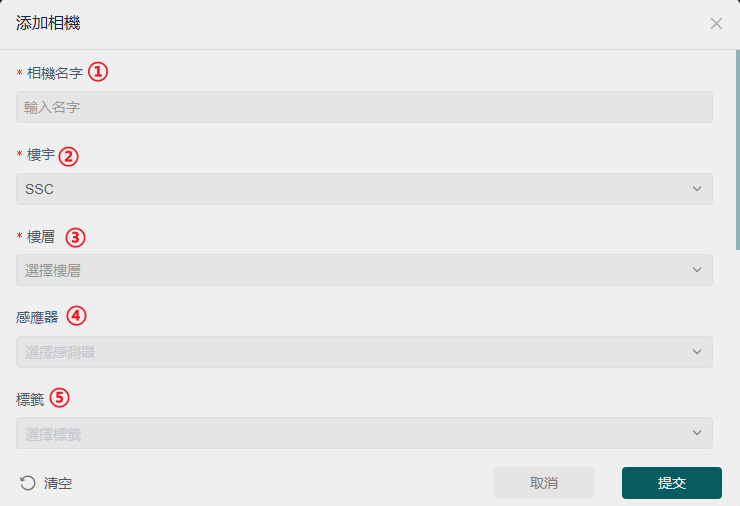
Enter the setting interface of [Settings-Camera Settings], select the [+ Add Camera] button to enter the camera binding interface, as follows [camera-add-01.png]
1.1 add camera
Enter the setting interface of [Settings-Camera Settings], select the [+ Add Camera] button to enter the camera binding interface, as follows
[camera-add-01.png]

-
Camera name: a custom camera name, which is the only key name for distinguishing cameras in this application, and can be set according to personal preferences ①
-
Building: Since there are multiple buildings in a project, the camera is bound to the building where it is located, which can be used to quickly locate the location of the camera (if the user does not select it, the system will associate it with the first building by default) ②
-
Floor: in order to distinguish the specific floor where the camera is located, the camera can be bound to the specific floor here, which can be used to quickly locate the location of the camera.
-
Sensor: if multiple sensors are installed in a certain area, it can be set according to the field of view of the camera in the area, that is, if there is any abnormality in the sensor within the visible range of the camera, set specific rules related to the camera in the rule engine (see the introduction of the rule engine of the platform for details), and then the abnormal alarm screenshot can be generated in the camera in real time,And link email and whatsapp to send relevant notifications. ④
-
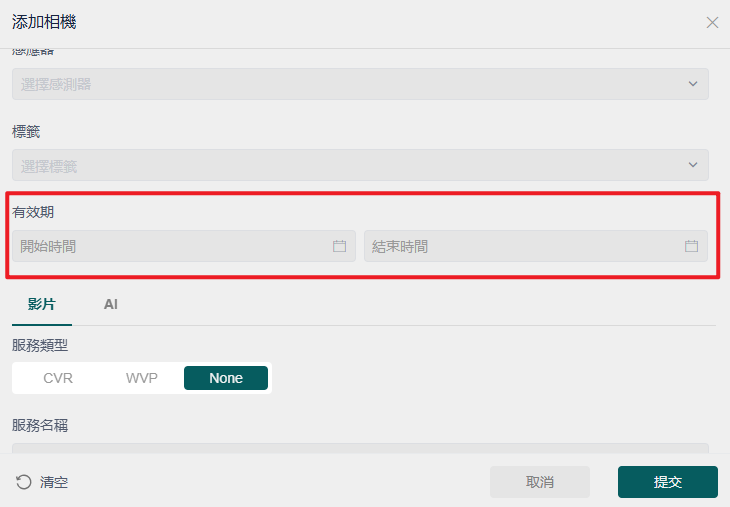
As shown in the following figure [camera-add-05.png], it is the service life of the camera AI function. For specific usage rules, please consult our operation team. However, it should be noted that if the validity period is set here, only alarm information within the validity period will be provided in [AI Analysis Interface].

Due to translation problems, the [camera] described in this document and the [camera] appearing in all screenshots are the same, so please do not confuse them.
1.2 Binding AI camera
If you have completed the above [1.1] configuration information and your camera has AI function, you can continue to configure the camera's AI function. If you do not have this function, you can skip this section and go directly to [1.3 Binding CVR camera] configuration in this document.
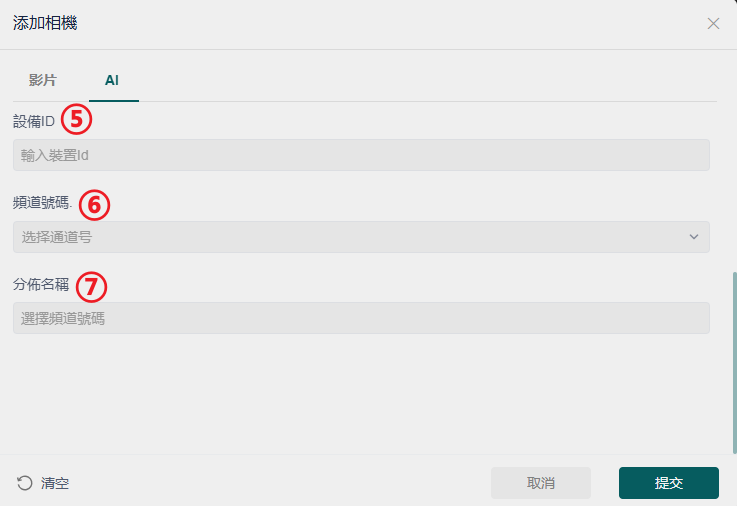
As shown in the following figure [camera-add-02.png], you can configure the AI camera

- Device ID: The background device ID where the current camera is located (this ID is provided by our company). Please note that this ID is not the ID of the camera itself ⑤
- Channel number: the background channel number where the current camera is located (this number and the above device ID are provided by our company) ⑥
- Distribution name: the name of the background distribution point where the current camera is located. It can also be used for other descriptions of the current camera.
After the above contents have been configured, you can save the configuration [Submit] and go to other pages to continue the experience. This [AI movie] and [CVR movie] can choose one to save the configuration, and then perfect the other configuration when there is a need.
1.3 Binding CVR camera
If your camera has video streaming or video recording related usage requirements, please refer to the content in this section to configure.
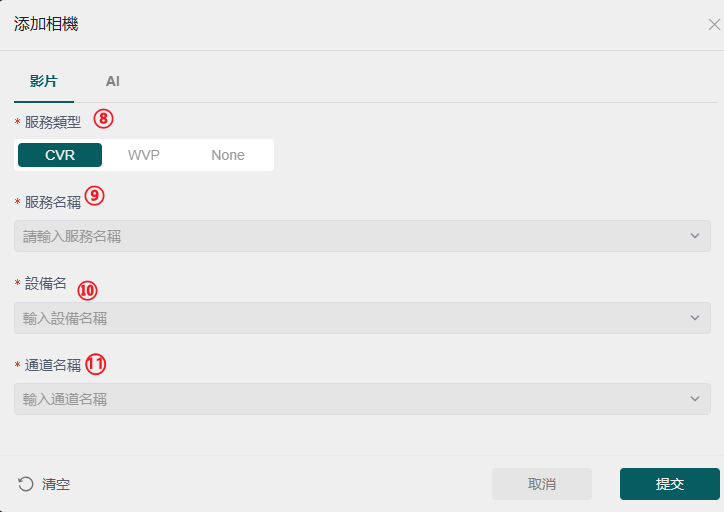
The following figure [camera-add-03.png]

8.CVR device: the background device ID where the current camera is located (this ID is provided by our company). Please note that this ID is not the ID ⑧ of the camera itself.
9.CVR channel name: The background channel number where the current camera is located (this number is the same as the above device ID, which is provided by our company)
After the above contents have been configured, you can save the configuration [Submit] and go to other pages to continue the experience. This [AI movie] and [CVR movie] can choose one to save the configuration, and then perfect the other configuration when there is a need.
1.4 Camera List
After the camera configuration is completed, you can view the list of all configured cameras on the setting homepage, as shown in the following figure [camera-add-04.png]

If you have administrator rights, you can modify the configuration of any camera, but please note that during configuration:
- [Name] + [Channel Number] + [Device ID] = AI Function Fixed Attribute Combination One
- [Name] + [CVR device] + [CVR channel name] = video stream function fixed attribute combination 2
Combination 1 and combination 2 can be configured at any one or both at the same time.